Instructions for etching titanium with Titan-Etch
Please follow these instructions carefully to make sure the etching process is safe and effective.
Safety
Cleaning and contamination
Titan-etch will react with many substances, even if those substances cannot be seen with your naked eye. Most problems with etching and anodizing occur when Titan-Etch reacts with substances that it is not supposed to react with.
This can, for example, result in unusual reactions during the etching process, discoloration of the etching solution, inefficient reaction or spots appearing on the titanium (after anodizing). In order to prevent these problems, it's important to use new or thoroughly cleaned storage containers and equipment. During cleaning wear latex, nitrile or vinyl gloves.
Also remember that your titanium parts must also be thoroughly cleaned before etching. An ultrasonic sonic cleaner can be used, but in addiction it's also recommended to clean the part with hot water, degreaser/soap and a sponge. After cleaning, do not forget to rinse your part in clean (distilled) water.
Warm or Cold etching?
Titanium can be etched either warm or cold: Warm etching is the recommended method and is described below. It will produce the most reliable, consistent and fastests results. Cold etching does not require heating equipment, but results can be less consistent. Read the
instructions for cold etching if you want to try this method.
Supplies & Equipment
- Plastic containers/canisters/bowls. (Standard PE or PP type plastics are recommended). Please remember that PE has a low temperature rating while PP can withstand much higher temperatures, and therefore PP should be used if the plastics come into contact with heat.
- Plastic or titanium tool(s) for stirring the etchant and handling the titanium parts(e.g. a plastic spoon or titanium wire).
- Distilled water to dissolve the etchant(commonly available at pharmacies, hardware and automotive stores). It can also be used for rinsing and cleaning your titanium parts.
- A heat source (e.g. a hot plate), a (metal)pan and thermometer.
Please note: Do not use any materials other than plastic or titanium (e.g. glass and metals) for handling and storing Titan-etch. If you do, your etching bath will become contaminated and loses its effectiveness.
Preparing the Titan-Etch solution
Titan-Etch must be dissolved in distilled water to produce the etchant (etching solution). Use the entire 250g or 500g jar/pouch of Titan-Etch when mixing it with distilled water, for the solid ingredients of Titan-etch
(crystals) do not mix homogeneously, resulting in an ineffective solution if only part of the Titan-etch crystals are used.
Please note: the following instructions are based on the use of 250g Titan-Etch. For the 500g pouches/jars of Titan-Etch simply double the amounts of distilled water and Titan-Etch listed below.
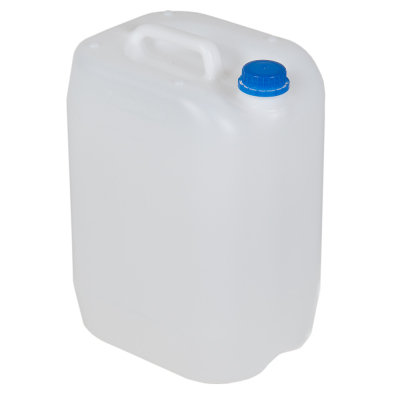
 Mix: The etchant can be conveniently mixed and stored in a plastic storage canister with lid (as shown in the image). Pour the entire 250g jar/pouch of Titan-Etch(crystals) in the plastic storage canister and add 1.85 L of distilled water. Stir or shake the mixture firmly and let it sit overnight to make sure all crystals are dissolved.
- Storage: When you are ready to etch, take out as much etchant as you require for the job. The rest of the etchant can be stored for later usage. The etchant has a shelf life of at least 1 year.
The Etching setup

-
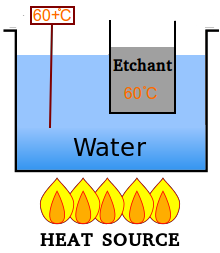
For heating the etchant the recommended method is to place a pan of water on a heat source (e.g. a hotplate) and suspend a plastic container with the etchant(your etching bath) in the water. This method of heating is also known as bain-marie. An example of a simple etching setup is shown in the figure to the right. A thermometer should be used to monitor the temperature. For the best results, keep the water temperature as constant as possible. Continue reading for detailed instructions on how perform the etching procedure.
Extracting the etchant
-
When you are ready to start the etching procedure, give the storage canister a good shake/stir and pour out only as much as you need into your etching bath. Do not pour used etchant back in the storage canister after etching, store it in a separate container (it can be re-used numerous times).
Please note: It's important that the storage canister with etchant is thoroughly shaken/stirred before pouring etchant into the etching bath. The Titan-etch crystals tend to sink and collect to the bottom of the storage container. Pouring from the top of the container without shaking will result in an etching bath yielding insufficient Titan-etch, and therefore an ineffective etchant.
Activating the etchant
-
Before you can use the etchant, it needs to be activated. It needs time, heat and stirring to completely dissolve and become active. Heat up the etchant and keep it between 60°C - 70°C, and regularly stir it during 30 minutes. Once the etchant is thoroughly dissolved the etchant is now active and ready to be used. You will only need to activate the etchant once. Once activated your etchant will stay active until the end of its life cycle. The etchant can now be directly used for etching(instructions below), or it can be cooled down and stored for later usage.
Please note: When using the bain-marie method for heating up the etchant, it takes considerable time for the etchant to reach the temperature of the surrounding water in the pan. It's advisable to give the etchant plenty of time to reach a temperature of at least 60 °C. An infrared thermometer can be used to check if the etchant has reached the desirable temperature. A less effective or non-working etchant is often caused by an insufficient temperature of the etching bath.
Reaction time
The reaction time (time your parts need to be submerged in the etchant) ranges from 10 seconds to a couple of minutes. The goal is to try and find an optimal reaction time. You should be able to visually see the titanium part change to a different shade/tint while in the etching bath. Grade5 titanium will for example get a slightly darker shade and duller look during the etching process. The optimal reaction time produces good coloring during anodising while retaining the original polish or finish of your part. If you're not able to anodise your titanium part to all the colors of the spectrum, your reaction time is likely too short. A insufficient reaction time can result in spots appearing on the titanium, while an overextended reaction time can result in a matte or dull finish. If you found a reasonable starting point, optimize the process by increasing/decreasing the reaction time using small increments. It's advised to perform initial test cycles with sample pieces of titanium and see which reaction times and etching conditions work best for your parts.
Fresh solutions usually have much longer reaction times than used solutions(the solution will increase in effectiveness after each etching cycle). The other important factor that determines reaction time is temperature.
- Etching Temperature:
The etching process is strongly temperature dependent. We recommend a temperature of 60 °C. Higher temperatures will speed up the process, while lower temperatures will slow down the etching process considerably. It is not recommended to go above 70 °C, since this will lead to an increased rate of evaporation of the etchant and the formation of unhealthy fumes.
- Other factors: Other factors that affect reaction time are: Concentration (a more concentrated solution will result in shorter reaction times), titanium alloy type(grade), thickness of the oxide layer, finish of your part and your general setup.
If you have a good understanding of the factors that determine reaction time, you are ready to start the etching procedure described below.
Etching Preparations
- Prepare a container with distilled or demineralized water, which will be used for rinsing the titanium parts beforehand.
- Prepare a container with distilled water, which will be used after the etching procedure.
- Clean the tools which are used to handle the titanium parts. Use only tools that minimize contamination of your etching bath(plastics).
The Etching procedure
- Heat up the etching bath and keep its temperature around 60°C.
- Clean the titanium part(s) thoroughly using degreaser/soap (an ultrasonic bath can also be used). Do not touch the titanium part with your fingers during and after cleaning (wear latex gloves). Subsequently rinse the part in distilled or demineralized water. Your part is now ready to etched.
-
Submerge the titanium part in the etchant and wait for the reaction to occur. Stirring the etchant while your part is submerged gives a faster and more uniform result. If needed the part can be taken out of the bath and be inspected. When you suspect that the reaction time is optimal, take out the part and rinse it with distilled water. The part can be kept in distilled water until you are ready to process it. The best anodising results are obtained when anodizing the part directly after the etching procedure.

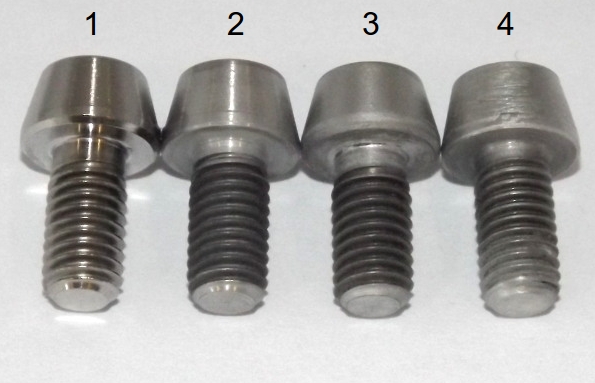
The picture on the right provides a visual indication for when your (grade 5/Ti6Al4V) titanium is ready for anodising:
1. Not etched.
2. Reation time too short.
3. Ready for anodising.
4. Reaction time too long.
We hope these instructions where helpful. Feel free to
request further information on the etching processes.

 Mix: The etchant can be conveniently mixed and stored in a plastic storage canister with lid (as shown in the image). Pour the entire 250g jar/pouch of Titan-Etch(crystals) in the plastic storage canister and add 1.85 L of distilled water. Stir or shake the mixture firmly and let it sit overnight to make sure all crystals are dissolved.
 The picture on the right provides a visual indication for when your (grade 5/Ti6Al4V) titanium is ready for anodising: